ALL3PM

Sharing tools and ideas for Portfolio, Program, and Project Managers

Why Projects Fail

Introduction

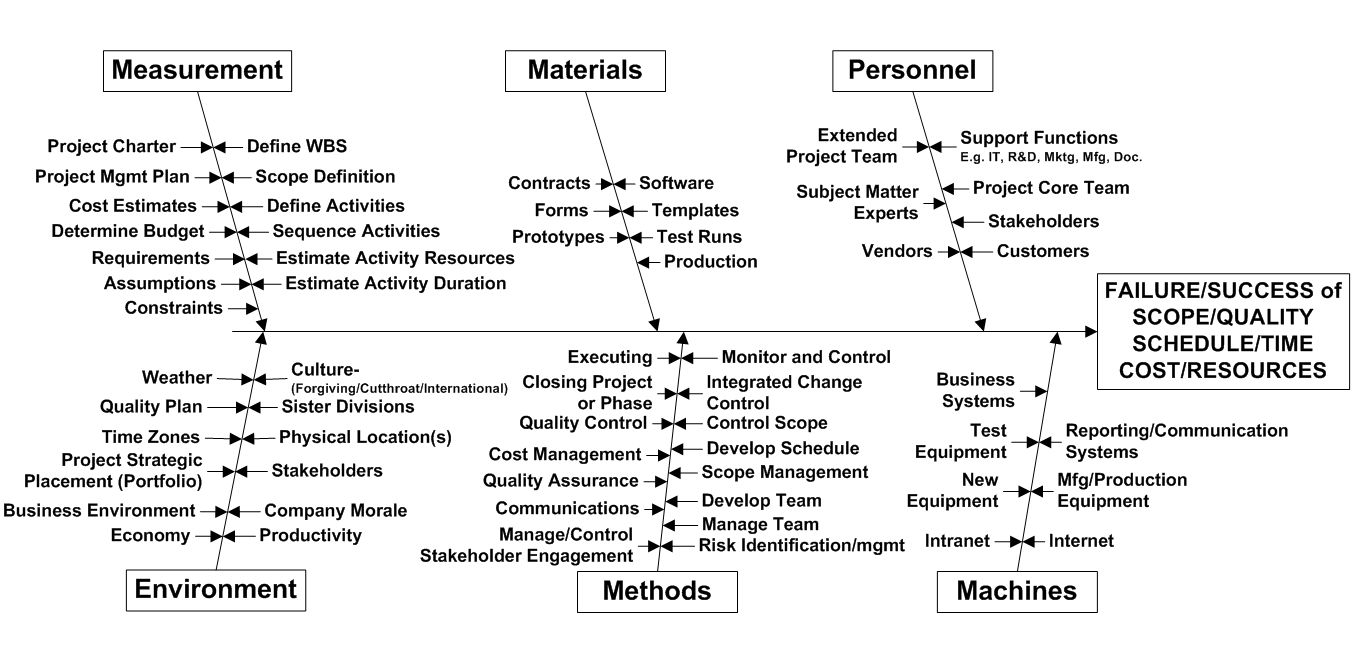
There are three primary categories of project failure or delay. The first objective of turning around a failing/delayed project is to identify causes. Once causes are understood potential remedies can be planned and implemented. Below is an outline of typical causes and/or symptoms of failure or delay.

Technical Development

There are many reasons for failure/delay in technical development whether hardware, software or service products.

a. Has the value proposition been identified?

i. You can’t design a product or process without a firm definition of what marketing has determined as the customer need and how the organization will satisfy this need. Fundamental.

b. Has product usage been identified? Sounds obvious but can be difficult in specialized niches or a new use for an existing product.

c. Poor customer definition.

i. Who’s the customer/user…the nurse, doctor, patient, purchasing, housekeeping, or other?

Hint 1: Everyone from the purchasing agent to housekeeping (disposal) is a customer/user. Does it meet their needs? If a hospital incinerates its trash can the materials be burned?
Anyone and everyone who touches or has to experience the product is a customer/user. And yes, unit and shipping packaging is part of the product. I’ve witnessed a medical disposable product launch get off to a very slow start because of product presentation (the method used to package). Current products on the market were presented on rolls for use where multiple units could be hung on an IV pole by the bedside for nurse’s use and convenience. This new product delivered individual units in a box. The box had to have a home in a drawer or on a shelf which was not always bedside. The product itself was a winner but acceptance slow due to expediency. BTW, the company made a change to rolls. This took several months with changes to parts, tooling, sterilization validations, and production.

Hint 2: Make a value stream process map on one axis showing the who, what, and where of the potential product flow from mfg. to hospital (vs. home vs. outpatient center vs. ?) through to disposal (trash vs. incinerator). On the other axis show/describe customer/user process flow for each user and location from diagnosis to therapy or want/need to supply. The axis should cross where customer/user meets product/service.

ii. Has the customer/user been formally defined?

Even if one of the users is the Doctor, has the type of Doctor been identified? The needs of an OB/GYN vs. a General Practice vs. a Nurse Practitioner are all different. Where are they located? Answers to these questions drive product requirements.

d. What is the product?

Is it hardware, software, service, combination, other?

e. Poor product definition

i. Without a. above being defined this cannot be done.

ii. Does marketing keep changing their mind as to features/benefits?

f. Poor product/customer requirements definition.

Need to answer who, what, and where in order to identify requirements.

g. Poor Engineering Requirements (ER) definition.

i. ERs must first be translated from product/customer requirements to ERs.

ii. ERs must be defined in a manner that can be measured or verified (NOT-Is this red enough?).

iii. Can you prove the product meets the requirements via facts (objective) as opposed to opinion (subjective)?

1. “Easy to carry” is not measurable and is a matter of opinion.

2. Product must weigh less than 10 lbs. is measurable and is a fact.

h. R&D not focusing on developing one ER at a time.

Several ERs are developed simultaneously thereby confounding the measurements necessary to determine which of the outputs meet the ER. This is particularly true when ER’s are at the opposite ends of the engineering spectrum, e.g. “Must be strong” vs. “Must be light” Q: How strong is strong? Requires defining tensile, cross section, etc. Q: How light is light? Requires weight definition. R&D needs to determine output individually or understand how the ERs relate.

i. Not understanding Key Input Variables (KIV) that drive ER output.

In systems there may be many KIVs that drive desired output. Most teams stop looking after they find 3-4 KIVs. Typically the other ones are found during launch when production variability via materials, process, and labor, are forced into the system. This may result in product slowdowns if product does not meet specifications or a recall if product makes it to market.
True story: I know of a medical disposable that had a designated activation force (ER). This device was made of several pieces of which two were rubber. One KIV to the system was the hardness of the rubber (durometer) for these two components. The company never measured durometer of this key component during production. Company received lots of rubber components that were too hard (high durometer). Product made it to market. Customers complained of high activation force. Company instituted a voluntary recall. Very costly in terms of dollars spent/lost and customer satisfaction!

Project Management

a. Time/Schedule

i. Forced upon team by executive management regardless of scope/costs

ii. No/Poor planning

iii. No schedule integration

iv. Death by a thousand cuts

v. No management control or feedback mechanisms

b. Scope/Quality

i. Scope is not defined or poorly defined (a top reason projects fail/delayed)

ii. Deliverables not defined

iii. Myriad scope changes without consideration of affect on Time/cost.

1. Marketing changes to

a. product requirements

b. Use requirements

c. Volume-from a 10k/mo to 1mm/mo.

d. Countries in which product will be sold

2. Manufacturing changes

a. Manual assembly vs automation

b. Mfg. location changes (from one plant to another)

3. R&D can easily add one more product feature

4. Regulatory issues

5. Legal issues

6. On and on and on……

c. Cost/Resources

i. Resources shuffled around due to firefighting because of No project-program-portfolio management.

ii. Poorly trained resources as in “(S)he’s an engineer let’s make him/her a project manager!”

iii. Task/Skill level mismatched

iv. Key Skill sets assigned to too many projects (always and always a bottleneck)

Hint: Lookup Critical Chain project management if this is a regular issue

d. Management dictating all three elements of the PM triple constraints (cost/scope/time).

This is dictating the length of all three sides of a triangle. Sometimes the ends meet sometimes they don’t, e.g. two short sides and one really long side. This also happens more than we care to admit and usually with a hand wave, “Make it so….”

Business Management

a. Projects/programs don’t align with strategy

i. No strategy

ii. Constantly changing strategies

iii. Not keeping up with changes in strategy

iv. Executive pet projects (happens all the time)

v. No method to determine if projects/programs align with strategy

b. Management doesn’t understand business strategy requires an implementation strategy.

It’s easy to say we’re going to the moon but if you don’t have any idea of what it may take it’s only a dream (or is that nightmare?)

c. “Culture eats strategy for breakfast”

A famous quotation attributed to the late business management guru Peter Drucker speaking to the need to have a business culture that can execute the strategy or recognize the need to change the culture to align with strategy.

d. No project/program portfolio management

i. Too many projects (This gets my vote for the No. 1 reason projects fail or delayed and a key killer of company moral.)

Many midsize companies easily have 200-300+ projects they can identify across all disciplines, e.g. R&D, Software, Mfg., Regulatory, Medical, Customer Service, Field Service, Supply Chain, etc.
As a manager of an R&D group in a large company I had 40+ projects for my group alone including NPI, line extensions, and Sustaining Engineering.

a. Some are high priority and assigned w/resources and costs.

b. Some are assigned w/resources and costs but no one is sure of their priority.

c. Some are picked at and mosey along when someone can spend some of their very limited time moving them along.

d. Some are hidden using hard dollars and resources

e. Some are department or executive pet projects

f. Some are project names or concepts only, on the To Do list, and without definition, scope, or resources.

g. Most require multidisciplinary teams.

ii. Too few resources/too few key resources

iii. All projects are top priority (therefore none are)

iv. Executive pet projects (happens all the time)

v. Not knowing the difference between a project, a program, and a strategy.

e. No project/program sponsor.

f. Lack of key decision making resulting in lack of scope definition.

i. Legal issues

ii. Regulatory issues

iii. Other issues(?)

iv. Flip flopping on decisions dependent upon whose making them or stakeholders involved.

This may happen when key decisions are made and take a long time to implement. Over time a new leader comes in who is now responsible for the former decision and does not believe in that decision and changes it without consideration of downstream effects.

Summary
This is a short list of the more typical causes of project failure and delay. My vote for the top two causes are:

1. Too many projects (or not enough resources) resulting in regular shifts in resource assignment and priorities.

2. No or poor scope definition resulting in regular changes to project deliverables.

Either of the above, if done perpetually, results in extremely inefficient performance and low morale.

The challenge in curing any disease is to: 1) Acknowledge there is a problem and 2) Diagnosis. Once a diagnosis is made as to potential cause(s) adequate steps may be taken to address causes.

Have a look through the list again, reminisce, and see if you recognize those causes that have affected your projects.

Question: What will you do differently next time?


Advertisement

Situational Leadership

“(S)he’s a micromanager.” How many times have you heard this in the workplace? In other words, a boss who tells you the who, what, when, where and how to get something done and checks on you every five minutes to make sure it’s getting done… right. The other end of this spectrum could be referred to as “being in over your head.” This is a situation where you could use some additional support, assistance, knowledge, or guidance and get…none. In both cases the management style does not work.

This article is a very brief introduction to the subject of Situational Leadership (SL). I’ve used this method successfully in the past. There is a great deal of information available regarding SL that goes into greater detail regarding the research and methodology. I urge you to read additional material on the subject and try the methodology. As PMs (i.e. project, program, people managers) we are constantly dealing with a plethora of individuals from novices to those with very broad and deep skills and experience. SL assists in our understanding and gives us a tool to adapt to our ever-changing needs. Once familiar with the SL model you will better understand why the particular management styles described in the above examples fail, irritates, and creates low moral for those that continually experience it.

Overview

Situational Leadership is a means to understand an individual’s “readiness” for a specific task, defined as one’s:

a) capability skill level for that task and,

b) willingness to accomplish the task.

Determining an individual’s “readiness” assists the boss-manager-supervisor-coach-mom-dad (“leader” for the rest of this article) in understanding how best to approach, coach, support, and instruct the individual, group, or team (“follower” for the rest of this article) that will result in successful task completion. Each assignment or task is unique requiring a review of readiness to determine the style of leadership best suited for the specific task and situation.

Background

The readiness of the “follower” determines how much engagement is required by the “leader”. Engagement consists of task and relationship behavior based on the following:

  1. Follower’s Readiness level – “The ability and willingness of a person to take responsibility for directing their own behavior.”  This is in context of a specific task to be performed.
  2. Leader’s Task Behavior – Based on the follower’s readiness level. A one way communication to the follower as to how much of the details of what, when, where, and how the task is to be accomplished.
    Task Behavior runs the gamut of the follower being assigned and executing the task for the first time where the Leader explains in detail as to how and when to accomplish the task (High Task Behavior). The other end of the spectrum would be the follower being an expert at the task where the Leader let’s go (essentially hands off) and fully delegates the task (Low Task Behavior).
  3. Leader’s Relationship Behavior – Two way communication with the follower to support and facilitate desired Task Behaviors.
    Relationship Behavior can be low when the follower is an expert and the leader “delegates” or low when the follower is new to the task and behavior is by communicating in one direction and “telling” the follower what to do. Relationship Behavior is high when the follower is past the mechanics of the task and the leader begins a two-way communication to explain and “sell” why the Leader wants the task completed a certain way, or when, as they become more familiar with the task, the follower begins to understand the task sufficiently to share their ideas and “participates” in the learning and development process.

Basic Concept

The model lies in a two by two matrix resulting in four levels of readiness summarized in Table 1. Along one axis, going from High to Low, is the willingness of the follower executing the task or assignment.   High willingness may mean the individual has performed the task in the past with a successful outcome or it may mean they are anxious to learn a new skill and desire to apply themselves to a new challenge. Low willingness could mean that this follower has performed this task a hundred times already and is not looking forward to doing it again or perhaps they had an earlier attempt and failed or they just are not sure they can successfully complete the task.

Along the other axis, also going from High to Low, is the follower’s capability to perform the task. High capability means the follower is knowledgeable, skilled, and competent at the task. Low capability means the follower has never done this task before or perhaps only one or a few times with mixed results.
There are four readiness levels each having a unique designation; R1, R2, R3, R4.

R1- High Willingness, Low Capability (Low)

R2- Low Willingness, Low Capability   (Moderate)

R3- Low Willingness, High Capability (Moderate)

R4- High Willingness, High Capability (High)

Each of the quadrants describes a different follower. The key to managing these four different followers is in understanding their level of readiness.

Follower Readiness

Table 1. Follower Readiness

Leadership styles, S1-S4, for managing the four readiness levels, R1-R4, are described below and can be found in Figure 1.

S1-High-task, low-relationship behavior.   Also known as “Telling” style as the leader is mainly telling the follower the what, when, where, and how of completing the task. There typically is minimal two-way communication.

S2-High-task, high-relationship behavior. Also known as “Selling” style as the leader still directs the follower but spends additional time convincing the follower as to why certain decisions were made. Two way communication is high.

S3-High-relationship, low-task behavior. Also known as “Participating” style as the follower has attained the knowledge and skill and the leader spends additional time in two-way communication while sharing decision-making.

S4-Low-relationship, low-task behavior. Also known as “Delegating” style as the follower has attained the knowledge and skills and willingness for the task and the leader hands over decision-making to the follower demonstrating trust in the follower. There typically is minimal two-way communication.

Leader Behavior

Figure 1. Leader Behavior

The Process

  1. Determine the specific task to be accomplished by the follower.
  2. Ask the capability question. Is this the first time the follower will attempt this task or is this a task that has been successfully accomplished by the follower in the past? Perhaps this is a task attempted previously by this follower that ended in failure.
  3. Ask the willingness question. Is the follower eager to tackle this new assignment or afraid of trying something new or different for fear of failure? Is this someone who has successfully completed this task a hundred times and doesn’t feel challenged?
  4. Determine the readiness level of the follower in relation to the assigned task. Determine the capability level and the willingness level on the Follower Readiness table shown in Figure 2. Note the location of the “X” on the table for this example. Marking the location for this situation will assist the leader in understanding which style will be most appropriate in assisting the follower in successfully completing this task.
  5. Draw a line from the X up into the chart until it intersects with the curved line running through the chart. Where the line intersects the curve will be the quadrant and the leadership style to use for this situation based on the styles S1-S4.
Figure 2. The Situational Leadership Model.

Figure 2. The Situational Leadership Model.

In this example follower readiness is low therefore the leadership style will be S1-High-task, low-relationship behavior meaning the leader will spend most of their time telling the following how to do the task and regularly following up to ensure adequate quality and completion. What they should not do is use an S2, S3, or S4 style.

Summary

Let’s go back to the very first paragraph and our examples. We now have a way to describe what is happening. Micromanaging results when follower readiness is R4 High Willingness, High Capability and the management style used is S1 High-task, low-relationship behavior. You can now see why the leadership style fails, “Don’t tell me how to do my job”. The follower can do the task while the leader is only getting in the way either because of control or trust issues.

In the second example follower readiness is R1 or R2 Low capability while the leadership style used is S3 or S4. This follower requires additional details on how to do the task and is not getting it because the leader is unavailable for any number of reasons.

Please explore additional material on this subject. This article is only to suggest that Situational Leadership is a good idea and could be a useful management tool. This is only a little bit of knowledge. Wisdom comes from knowing when and how to use the knowledge.


Death By A Thousand Cuts or How To Slow Down Your Project Without Knowing Why

Just an observation regarding resources and resource planning.  When I’ve viewed other PMs project plans I’ve noticed that they assign resource names of core team members (first level) and many times extended team members (second level) and Subject Matter Experts (SME).  What I don’t see many PMs do is regularly create and assign resources to ALL “touch points” in a project.  My definition of “Touch Points” is any person, department, division, R&D/production/test equipment, vendor, supplier, or other that interfaces with the project and that must provide inputs or produce an intermediate or final output of some kind to the project.  Case in point, how many list the documentation department, metrology, or equipment maintenance as a resource in projects?  Why not?  New product projects easily generate hundreds (sometimes thousands) of Engineering Change Notices (ECNs) or Engineering Change Orders (ECOs). If the documentation dept. is a small staff and you have a  new medical product that generates one thousand ECN/ECOs over one year at one hour per ECN/ECO for review, input, processing, scanning, approvals, recording, backups, filing, and offsite storage you’ve just handed the dept.  1000+ hours of work or 6 man months of labor.  Will they be able to absorb that amount of additional work?  Are other projects ongoing that will add additional labor to this dept.?  Does the Doc. Dept. even have the budget for overtime or hire additional temporary staff if needed?  These are typical areas that are outside the project that we normally take for granted.  I worked on a project that revalidated an entire manufacturing site.  There were 1800 Installation Qualifications (IQ) alone not to mention additional Operational Qualifications (OQ) and Process Qualifications (PQ).  Each protocol had to be submitted and approved and put into documentation BEFORE execution.  Every executed final report had to be approved and placed into documentation.  That alone is two ECN/ECOs times 1800 IQs equals 3600 hours of additional labor!  By adding touch points to your project plan you can summarize your findings and have data to discuss with others. With this information you can meet with affected department managers and go over your findings and come up with a plan to address this potential bottleneck.  Perhaps the additional labor required to pay for processing ECN/ECOs comes out of your project budget!  This is the foresight and preplanning for which excellent PMs get paid.  The alternate is to wait three to six months into the project and keep bringing up and explaining why deliverables are late, “The paperwork is still in documentation!”

You get the idea.  Add ALL touch points as resources to your project plan.  Summarize and share the data with the affected parties.  They can approve your plan or you’ll at least have time to make changes that will minimally affect your schedule.

Using Six Sigma Tools for Project Risk Management

Show your work.  It’s not just for math teachers.  I’m a big fan of using and creating tools that allow me to explain and someone to follow my thought process.  While great as a communication tool it also allows me to share my ideas with others and how I came to my conclusions.  I currently work with inventors and students in the nascent stages of commercialization.  Mainly engineering or PhD types working on a product idea, the simple question “Who’s this for…?” causes puzzlement and consternation.  “Do you have written requirements…?”  A Requirements Document is a simple example of showing your work.  Others can look over the requirements and contribute by seeing what is written down.  It allows you to constantly input, review, and modify any requirements as new learnings and discoveries are made.

I use this example to help explain using a Cause & Effect Diagram, aka Ishikawa Diagram or Fishbone Diagram, for project risk management.  This is a simple Six Sigma Tool to assist in understanding where areas of risk may develop.  In Figure 1 below you can see the sections of the diagram.  The Effect is listed in the box on the far right.  You list ONE item of failure (or you could list a success), Scope, Schedule, or Cost. Then under the six main groupings of Measurement, Materials, Personnel, Environment, Methods, and Machines you list input factors that may have an effect on the output of  Scope, Schedule, or Cost.

Figure 1 Project Management Cause & Effect Diagram

Figure 1 Project Management Cause & Effect Diagram

In Figure 1 I’ve listed many items as found in the Project Management Body Of Knowledge (PMBOK) 5th Ed. plus a few others.  This is to help with the thought process.  For each of the secondary inputs you should be able to add additional detail.  For example, under Environment>Physical Location you could add additional legs for each of the various plants/division locations that interface with your project.  Many global companies develop in one location, pilot in another, and scale up in a third location.  Each of these should be listed.  Each one has its own risks associated with it.   THAT’S THE POINT.   You’ve now identified a potential risk to add to your risk register to grade and review and determine its level of risk.  Any risk item must fit on the cause and effect diagram because it is an input that has an effect on the output, e.g. schedule.  YOU’VE JUST SHOWN YOUR WORK.  In the risk reviews I’ve participated in everyone starts listing detailed risks.  There is no systematic method to ensure you’ve at least looked over the landscape. Another way of putting this is looking from the 10,000 foot lever meaning a broad overview.  Now someone else can come along and review your Risk related Cause & Effect Diagram at both a high level and detail level.

This tool is a way to systematically review and capture a wider and deeper look at potential risks.  Let’s not forget that it may also be used to capture success’ and understand what inputs were driving successful projects.  This is a simple tool to assist in better outcomes and at the same time allowing others to follow your thought process.  Show your work!

How Do You Plan With Your Team?

How do you plan your project?  How do you create, gather, compile, organize, and record your project plan and schedule (remember these are two different things…)?  Do you or your company have a procedure or is it ad hoc (“fashioned from whatever is immediately available…”)?  I’ve seen a range of planning, from:

1) the PM slapping together a Gantt chart,  then handing out the schedule with a few names here and there (think of this as resource planning), to

2) kickoff meetings where key items are discussed and recorded, to my favorite-

3) a full two and a half day planning session.

Each method above has its advantages and disadvantages.  I’ll touch briefly on the first two then describe why I believe the third choice is superior for medium to large projects.

In order of appearance above…

1) In the first method little upfront time is invested (low cost),  resources begin work immediately (hitting the schedule hard!), while true cost of the project ($$$) is determined later (and several times over) when all the project SCRAP is continually changing. (SCRAP- Strategy, Constraints, Risks, Assumptions, Parking Lot (unresolved questions)).   Comment: while the good news is they at least have a schedule my comment is this is a thinly disguised state of continuous confusion.  The PM and or management thinks they will meet the schedule because someone created one.  Meanwhile all the issues that plague projects will appear (they always do) and the schedule will be done over and over again until someone (PM, stakeholder, or business) runs out of money or time.

2) In the second method time is invested in determining or agreeing on Goals, Objectives, and Scope, perhaps at a project kickoff meeting.  Additional meetings are required to determine SCRAP one or more component at a time over the course of several days, if not weeks, maybe, maybe not.  My experience with this method is that teams tire of the additional meetings very quickly.  Getting team members to attend multiple planning meetings may be difficult especially if they are already attending the project meetings.  Key inputs may or may not be determined in advance.  In some cases they are dictated and not agreed upon by team members.  The good news is this method recognizes the need to obtain inputs from and communicate high value aspects of the project to team members.  Key decisions may be captured in a PM plan or at least captured in meeting minutes.  Discussions will evolve around typical project issues.  Time is limited to discuss full breadth or depth of project related matters.

3) As is the case in all these methods the purpose is to improve project definition, boundaries, understanding & strategy.  The multi-day planning session typically has higher up front time related costs.  8-10 core team members participate @ $50/hr for 20 hours = $10,000.  Plus meeting expenses, e.g. large meeting/conference room, food, projector, easels, etc.   Team members are introduced (team forming/storming/norming) and become focused on the project over the course of 2.5 days.   In addition to Goals, Objectives, and Scope the team defines and begins to understand project SCRAP.  Figure 1 below shows the agenda for this multiday exercise.Planning Session-Agenda

You should be familiar with many of the items listed on the Agenda.  Some of them are less traditional.  The slide titled  “Where are we?” is intended to capture what is currently known and perceived about the project.  Also the slide asks the additional questions “What do we know we don’t know?”, “What should we know that we don’t?” and “What don’t we know that we don’t know?”.  Also, when was the last time (or first time) you ever did a SWOT analysis (Strengths, Weaknesses, Opportunities, Threats) on a project?  Some of this may be covered during Risk Analysis.   The idea here is to immerse the core team/key player or stakeholders into the thought process for this project to uncover many of the discoverable issues as soon as possible in order to address them.

Scheduling multiple meetings and handing out multiple agendas (method 2) does not typically allow for the depth and breadth of discussion required of key projects.  In the multiday session many of the discussions are done as exercises using flip charts.  These notes are hung as they are completed around the conference room and stimulate discussion in other areas.  Also, as the meeting progresses and decisions are made, new insights are gained then a finger goes up “That’s not on the list”  and someone goes over to capture the  new insight on the appropriate flip chart.  The immersion and visual notes (flip charts) capture more information quickly allowing for deeper,  broader, and focused discussions.

Once the meeting is completed all information is gathered, captured and placed into what becomes the initial Project Management Plan.  It doesn’t take but one day to type up the notes, place them into an outline and publish it to the team, stakeholders, and management for feedback.  There are typically unanswered “Parking Lot” issues/questions that require resolving.  The Project Management Plan will be modified based on the responses to those questions/issues.

I’ve both facilitated and been on teams using this approach.  The PM plans that results from this method are outstanding with higher quality inputs and less surprises during execution.   While  this method may be used at anytime it is not for every project.  With a high upfront cost it should be used for efforts that are of strategic importance, high cost, or high risk.

I have a slide deck of 40 slides I created to prepare and facilitate this multiday planning methodology.  It includes the slides and speaker notes to facilitate the meeting and what is needed to prepare for and execute the meeting.   Send me a request and I’ll forward the slide set to you free no questions asked.  This is another tool I’ve found to be extremely valuable therefore  the desire to share it and see it used by others.  I hope it does for you what it has done for me….execution of projects with fewer bumps and surprises and improved outcomes.

Project Management Synthesis (or PMS for the PM)

AN·A·LYZE verb (used with object), -lyzed, -lyz·ing.  (from Dictionary.com)

1. to separate (a material or abstract entity) into constituent parts or elements; determine the elements or essential features of; e.g. to analyze an argument.
2. to examine critically, so as to bring out the essential elements or give the essence of: to analyze a poem.
3. to examine carefully and in detail so as to identify causes, key factors, possible results, etc.

One who analyzes is an:

AN·A·LYST noun   (from Dictionary.com)

1.a person who analyzes or who is skilled in analysis.
There are many types of analysts:
BA Business Analyst
CSBA Certified Software Business Analyst
AFA Accredited Financial Analyst
CRA Chartered Certified Risk Analyst
CAPA Certified Asset Protection Analyst
CITA Certified International Tax Analyst
And so on…
There are no Project Management Analyst (PMA) jobs, titles, or positions that I’ve ever run across. (If you see one let me know. I’d be very interested in see what’s in that job description.)  While there are no formal job descriptions for this portion of your project manager position it is a key activity to your success that will contribute to your being an outstanding Project Manager.  A PMA must understand all the INPUTs to their projects that will have an influence on the OUTPUTs of their project (or deliverables). Recall that you must analyze, to examine critically, so as to bring out the essential elements, all inputs necessary to determine which ones are important enough that they will have a material affect on the outputs or deliverables of your project. What does this mean?  This is a Six Sigma approach applied to project management.  Things like risks, assumptions, constraints, and stakeholder identification are all INPUTs to your project plan.  In Six Sigma process development these are refered to as KPIVs or Key Process Input Variables.  These and other input variables have a bearing on the final OUTPUTS of cost, quality/scope, and timing of your project.  The quality side of these inputs are called CTQs, Critical To Quality.  They are the independent variables that directly affect your OUTPUT or desired deliverables.
Yet, being a PMA is only a portion of the key activities required to becoming an above average project manager. To deliver your schedule within the triple constraints you must bring all the elements together into a cohesive whole or synthesize your KPIVs to be able to tell a story on how to get from your  key inputs to your desired outputs. You must become a Project Management synthesist (PMS).
SYN·THE·SIZE  verb   (from Dictionary.com)
1.to form (a material or abstract entity) by combining parts or elements
Every team will create a different project plan and schedule, given the same inputs, based on the team’s skills, training, and experience. It is your job as the PM to synthesize and create the vision, plan, and schedule that is achievable.  Let me repeat-It is your job as the PM to synthesize and create the vision, plan, and schedule that is achievable.  While this may seem to be stating the obvious I’ve seen PMs put together project plans that were not realistic from the get go.  When queried, the response I got was “Manufacturing wanted it this way!” (???)  This PM did not create and synthesize a plan into a cohesive whole. What they planned for was eventual chaos and failure.  In other words outputs  didn’t match the stated inputs.  Even before project execution began you could review this plan and read the words “Defeat” across it.
As PMs our roles are to create and describe a vision of how to get from A to B, create a plan and schedule in a reasonable level of detail, and communicate this vision and plan to all core team, extended team and management.  With a core team of 15, extended team members of 30+, support functions, suppliers, and management you will have easily over 100 people in which you will have to communicate your vision.  I once had a boss that accused me of being “repetitive.”  While he meant that negatively I took it as a complement because it is my job to make sure everyone understands project goals, plans, and how you get from A to B.  You can give a message 100 times to a group.  Some get the message the first time, others don’t or won’t get it after the 100th.
Make sure you understand all the KPIVs for your project then synthesize those elements into a cohesive whole.  Bring it all together  to create the vision and paint the picture.  When a project fails it can be traced back to either one or more KPIVs were not properly identified therefore its affect on project outcome was not controlled or one of the KPIVs changed  and as an independent variable had a material affect on the outcome.  Outputs are driven by KPIVs make sure as a PMA/PMS you understand both.

Basic Portfolio Management or “Doing the right projects.”

Basic Portfolio Management or “Doing the right projects.”

I’ve worked in organizations where everyone sets their own priorities.  That’s great as long as they are the only one in the entire organization.  Since that was not the case there were lost opportunities in maximizing outcomes.  This blog is an introduction into the idea, not a new one, in which you should understand all the projects and programs you have ongoing (the portfolio) and determine in some manner those that are of most value to the organization, value not necessarily meaning money.

Here’s the definition of Portfolio and Portfolio Management from PMI’s The Standard For Portfolio Management 2nd Edition:

Portfolio– A collection of projects or programs and other work that are grouped together to facilitate effective management of that work to meet strategic business objectives.  The project or programs of the portfolio may not necessarily be interdependent or directly related.

Portfolio Management– The centralized management of one or more portfolios, which includes identifying, prioritizing, authorizing, managing, and controlling projects, programs and other related work, to achieve specific strategic business objectives.

Figure 1 Project Portfolio Flowchart

Figure 1 shows a basic process that describes a generic portfolio management method to prioritize a portfolio of projects.   Inputs and Outputs shown are lists or documents or information that is written down and agreed upon by those involved in the process.

Most businesses do portfolio management at some level even if they don’t call it that.  They go through a mental exercise of; Project A takes 2 years to complete, costs $500,000, and pays back $3 million. Project B takes 4 years to complete, costs $2 million, and pays back $4 million.  Most business would choose project A.  The key point is that they have identified three evaluation criteria in which to make their decision- Completion time, Cost, and Payback.  The trouble is that there are typically many evaluation criteria not a few.

Figure 2 Project Priority Categories

Figure 2 is a basic list of high level criteria that may be used to determine where the value lies in a project.  There are only nine categories in this example with some various values to give you an idea of what can be done. Some portfolios may use a system with dozens and I’ve heard of portfolios that have a couple of hundred or more evaluation criteria.  Typical use is to assign a value to a project for each category/line on the list and score the project based on its assigned values.  Since there are nine categories with five points being the highest value in each the highest project score would be 5 points x 9 categories = 45 total points.  I’ve also added a weighing column to give you an idea of other options.  Do this for each project.  High scores should be top priorities.  Now do a reality check.  If your highest priority project isn’t on the top of the list determine why! Are there additional criteria you’re mentally using that aren’t accounted for using the scoring method?  Is the high priority project a pet project sucking up valuable resources regardless of its value to the company?  This is not uncommon.  Use this information to make an informed and data driven decision!

Basic steps required to prioritize (per Figure 1):

  1. Determine the strategy for your organization.  Should be written strategy, goals, and objectives.
  2. Determine who will be involved in this process, president, VPs, director level?
  3. Determine the list of portfolio components (projects) with some minimal level of detail, e.g. How many components? How much will each cost?, How long to completion?, How many man-hours will this take?  What do we get in return (dollars, market share, mindshare) and how much?
  4. Assign values and rank each component.
  5. Balance components. Are you doing all new product introductions or manufacturing cost reductions or a combination of both?
  6. Approve your portfolio.
  7. Assign resources.  This means assigning resources be they people, equipment, or dollars to each portfolio component from the top portfolio priority until you run out of one of the resources because resources never precisely match your portfolio.  You can either use the leftover resources to work on projects farther down the list knowing these projects will be slow moving due to a shortage of required resources or you can use leftover resources and apply them to the projects higher up the list and previously resourced to expedite where possible.
  8. Execute.

It’s imperative that those portfolio components that are assigned full resources are monitored and controlled to effectively execute each of the project plans.  If you cannot execute your fully resourced high priority projects there will be a need for discovery as to why and how it fell short.  There should be some adjustment somewhere in your process.

Small companies and big companies do portfolio management.  Small companies and big companies don’t do portfolio management.  You can tell which one does or doesn’t after working there for a brief period. Companies that do portfolio management typically have higher worker moral and are more productive. Companies that don’t typically have lower moral and are less productive. This is because personnel are yanked from project to project fighting the latest fires that erupt requiring a refocusing onto the new high priority project resulting in lost time due to changeovers and the new learning curve required of new projects.

I urge any organization that has more than a few projects to use this simple outline.  Outcomes are higher moral, higher productivity, and better strategic implementation and performance.

When was the last time you actually created a Project Management Plan? (Not just a schedule?)

When was the last time you actually created a Project Management Plan (PM Plan) and not just a schedule? The Project Management Body Of Knowledge 4th Ed. definition;

Project Management Plan [Output/Input]. A formal, approved document that defines how the project is executed, monitored, and controlled.  It may be a summary or detailed and may be composed of one or more subsidiary management plans and other planning documents.

Formal usually means written.  Approved, should be at least by two or more otherwise it’s not approved.  You just become both author and approver. 

I’ve posted one example of a plan I created for a major project.  Refer to Fig. 1 Project Management Plan example.  This was a major corporate initiative and a large complicated project with 150 people onboard at its peak running across several business units and multiple sites in four states across the United States and a budget of over 20 million dollars. I’ve only shown the Table Of Contents to give you an idea what can go into a PM Plan.  If you work for a large company they may have a template or form to use.  Many of the large companies I’ve worked for had no formal PM Plan procedures.  The Project Manager would put together a schedule and that would become the “Plan.” There would be a business feasibility study (most of the time) but not much in the way of an over arching plan or how it fit into the company’s strategy.  From the example you can see that I showed from the top down how this project fit into the companies goals and how it fit into the site goals.  Overall this PM Plan example was a 57 page document and DID NOT INCLUDE ONE SCHEDULE OR GANTT CHART!  The example described key aspects that would be put into the Work Breakdown Structure and schedules but in itself did not contain a schedule. 

Fig. 1 Project Management Plan example for a large project, 150+ people.

Fig. 1 Project Management Plan example for a large project, 150+ people.

Key aspects of this plan were communication and organization.  Meetings were held every day. Two days of individual team meetings, then core team, next the main site leadership meeting, and finally wrapped up with a corporate meeting with VPs.  So it went week after week.  It was imperative that we structured the who, what, and when of each of these meetings.  The escalation process followed. If a team couldn’t make the decision it went to the core team, next site leadership then up to the VPs if no decision was forth coming.  

Organization was also key.  With 150 individual employees and contractors it was imperative that everyone knew who was on what subteam and who the contacts were for the many offsite resources.  One lesson learned during the project is to make sure you have the NAMES of all individuals that are assigned to your project.  In many cases the functional manager assured us we would have support so in the organization chart I added the functional group name, e.g. R&D Engineer or Quality Engineer.  When it came time to interface with these individuals it took over one week to determine WHO was assigned and accountable.

Peruse this Table Of Contents and see if there are areas you could/should capture in writing.  Are there areas that standout because they were not written down before, then they changed during execution resulting in major negative affects on your project?   If you only write down your current understanding of these items and share them with management or other team members you’re bound to generate discussion and feedback which should result in a better plan.   Who are you going to talk to for expert advice?  Are there outside influences?

Remember not to get bogged down in style or formatting.  It’s more important that you think about each of the items in the Table of Contents and even if there is nothing appropriate write “Not Applicable” it will show that at least you gave it consideration.

While this may seem a bit much for smaller projects my question would be “How much are you willing to do to improve your probability of success?”

Custom scheduling tools and databases – Part IV (Final)

This post continues to discuss the final six Microsoft Project templates continued from previous posts, Custom scheduling tools and databases – Part I, Part II, and Part III.  These posts are about using your scheduling software as a database to create custom tools needed to plan, execute, monitor, and control your projects. The advantage is that it keeps your project data in one place while associating the data with the appropriate tasks and resources.
 
Next views on the list are resource management templates PMO_Resource-To Do Tasks, Fig. 1 and PMO_Resource-Incomplete Tasks, Fig. 2.    These are output views.  PMO_Resource-To Do Tasks View does as it is titled, lists all tasks for a specific resource for a window of time and groups them by week that the task should begin. When PMO_Resource-To Do Tasks View is selected you are first prompted for three pieces of info: 1) To choose a resource name from the dropdown list, 2) Choose a starting date, 3) Choose an end date (must be greater than the start date.  The view will then filter the view for only that resource and group by week all tasks that Start within the time period selected.  Time period could be weeks, months or years but are always grouped by week beginning Monday.  For the screen shot I choose several months but as a practical matter a few weeks at a time should be sufficient. When there are many resources on a project this view and related printout are invaluable for communicating responsibilities and schedules.  I had four Project Coordinators who printed out dozens of these reports on a regular basis then gave these printouts to the resources.  Resources reviewed current work and upcoming work with their team leader to make sure they understood the timeline and the amount of work required to keep the project on track.
Fig. 1 Microsoft Project template Resource-To Do Tasks screen shot

Fig. 1 Microsoft Project template Resource-To Do Tasks screen shot

 PMO_Resource-Incomplete Tasks View does as it is titled, lists all incomplete tasks for a specific resource for a window of time and groups them by week tasks should be completed.  When PMO_Incomplete Tasks View is selected you are first prompted for three pieces of info: 1) To choose a resource name from the dropdown list, 2) Choose a starting date, 3) Choose an end date (must be greater than the start date.  The view will then filter the view for only that resource and group by week all tasks that are incomplete and should be finished within the time period selected.  Time period could be weeks, months or years but are always grouped by week beginning Monday.
Fig. 2 Microsoft Project template Resource-Incomplete Tasks screen shot

Fig. 2 Microsoft Project template Resource-Incomplete Tasks screen shot

 The fields for each template are the same. Descriptions are below. I’ve noted Custom Fields with a (CF) notation. 
  • Task Name – Regular WBS Task Name.   PMO_Resource-TO Do Tasks is grouped by week the task should begin.  PMO_Resource-Incomplete Tasks is grouped by the week the task should be completed.
  • Start – Date the task is to begin.
  • Finish – Date the task is to be completed.
  • Accountable (CF) – I added this column because there were several resources for the majority of tasks and it was unclear who had final authority for task decisions and completeness.
  • Resource Names – Individuals assigned and “responsible” to achieve the task.  
 PMO_Resource-To Do Tasks and PMO_Resource-Incomplete Tasks are formatted to print on 8.5″x11″ (letter) sheet for comments and review. 
Fig. 3 Microsoft Project template PMO_Slipping Task screen shot

Fig. 3 Microsoft Project template PMO_Slipping Task screen shot

PMO_Slipping Tasks, Fig. 3, is also an output view.  Inputs to this view come from other views.  This view describes the who, what, when, and why of task slippage. Purpose of this template is to communicate project status by identification of all late incomplete tasks regardless of  the resource or who is Accountable.  Below are descriptions of each field.  Custom Fields are noted as (CF). 
  • Task Name – Regular WBS Task Name grouped by when the task should be completed.
  • Task Issues (CF) – This field is to capture issues affecting task completion.  This field is typically filled induring updates to the schedule using the PMO_Tracking Gantt view.  Use this field to describe the cause of the issue.  These should be escalation issues meaning you have to go outside the project team for resolution.  This field is NOT for describing general task status. 
  • Accountable (CF) – I added this column because there were several resources for the majority of tasks and it was unclear who had final authority for task decisions and completeness. 
  • Status – This is an MS Project generated indicator which can be sometimes misleading. The Status field indicates the current status of a task, specifying whether the task is Complete, On Schedule, Late, or a Future Task based on the MS Project algorithm.  The trouble with this is that you can begin a task ahead of schedule (good) then fall behind on this task (bad) meanwhile the task Status will read Future Task (due to the baseline) which is no longer true. This is why I’ve added the next custom field…
  • Slipping Tasks (CF) – This field calculates whether a task is slipping based on the baseline or actual start if started early then gives you an indicator based on the number of days the task is behind schedule;  Yellow 1-10 days late, Red 11-20 days late, Black >20 days late.  If completed the status changes to Green (100% complete). 
  • Actual Duration – Number of days actually spent on task.
  • Rem(aining) Dur(ation) – Number of days left to complete task.
  • Actual Start – Date the task was started.
  • Finish – Scheduled finish date of task.
  • Baseline Finish – Scheduled baseline finish of task.
 PMO_Slipping Tasks is formatted to print on 8.5″x11″ (letter) sheet for comments and review.
Fig. 4 Microsoft Project template PMO_Critical Path screen shot

Fig. 4 Microsoft Project template PMO_Critical Path screen shot

Fig. 4 Microsoft Project template PMO_Critical Path screen shot is a an output view used to communicate project status.  This view filters only tasks that are on the critical path.
 Custom Fields marked with a (CF) notation. 
  • Status Indicator – The Indicators field displays indicators that give different types of information about a task.  Go to the link for more details.
  • Task Name – Regular WBS Task Name.
  • Duration – Duration used by MS Project for calculating schedule.
  • Start – Planned start date of task.
  • Finish- Planned finish date of task.
  • Accountable (CF) – I added this column because there were several resources for the majority of tasks and it was unclear who had final authority for task decisions and completeness. 
PMO_Critical Path is formatted to print on 8.5″x11″ (letter) sheet for comments and review.
Fig. 5 Microsoft Project template PMO_Network Diagram screen shot

Fig. 5 Microsoft Project template PMO_Network Diagram screen shot

PMO_Network Diagram, Fig. 5, describes predecessor and successor relationships. Usage of this view is better described in the post SCRAPP™ Method or How To Integrate Your Schedule.  
Fig. 6 Microsoft Project template PMO_Gantt Chart screen shot

Fig. 6 Microsoft Project template PMO_Gantt Chart screen shot

The last view is the typical (Yawn!!!) PMO_Gantt Chart.  I add it here for historical purposes only and because if I didn’t people would continually ask “Where’s the Gantt Chart?”  I can’t tell you the number of times I’ve asked someone for their project plan (not schedule) and they pull out a 20 page stack of this nonsense. Who looks at this stuff? Not management!  The first thing this tells me, if this is all they give me, is that the person running this project doesn’t really understand project management only how to operate MS Project (or whatever software used to create it). This is the reason why I’ve developed and used the previously described views and templates in order to initiate, plan, execute, monitor and control my projects.

This post captured the last six views discussed in this series. As shown with the various views we’ve created a pretty wide-ranging project database, used various views for inputting information and using the same data in different output views for communication and status.  This should give you the idea that you have very specific requirements and data needs for your projects.  Extend your database a little farther in your project. Take Project and add one or more custom fields and views to capture that information as it relates to tasks or resources or some other aspect of your project and keep your project info  current and concise.    

If you would like the MS Project file with all views already included send me an email with your request to wayne@all3pm.com and I will forward a copy to you.  Any feedback you care to provide is greatly appreciated. 

Thanks for following…

Custom scheduling tools and databases – Part III

This post continues to discuss six more Microsoft Project templates described in previous posts, Custom scheduling tools and databases – Part I and Part II.  These posts are about using your scheduling software as a database to create custom tools needed to plan, execute,  monitor, and control your projects. The advantage is that it keeps your project data in one place while associating the data with the appropriate tasks and resources. 

Next on the list is an expense and capital cost estimating template PMO_Costs, Fig. 1.  This template is for estimating project costs by inputting optimistic, expected, and pessimistic expense costs then calculating an amount based on the equation described below.  

Fig. 1 Microsoft Project template PMO Costs screen shot

Fig. 1 Microsoft Project template PMO Costs screen shot

I’ve noted Custom Fields with a (CF) notation.  Reviewing the definitions for each column going across are:

  • Task Name – Regular WBS Task Name
  • Cost Assumptions (CF) – Captures assumptions and inputs used to generate the costs.
  • Cost Optimistic, Expected, Pessimistic (CF) – Range of potential costs.  Good practice is to ask others who have completed similar tasks and determine typical costs required to complete the task.  This will provide a best, worst, and average to use for input. This should be done for each task that will generate an expense toward the project.  Highly recommended for tasks with a wide degree of variability.
  • Cost Most Likely (CF) – Calculated using  (Optimistic+(4x Expected)+Pessimistic)/6
  • Cost Capital- Fill in with best estimates of cost to obtain capital goods.  Can usually be done via quotations. 
 PMO_Costs is formated to print on 8.5″x11″ (letter) sheet for comments and review. 
Fig. 2 Microsoft Project template PMO Progress Rollup-Inputs screen shot

Fig. 2 Microsoft Project template PMO Progress Rollup-Inputs screen shot

Fig. 3 Microsoft Project template PMO Progress Rollup-Report screen shot

Fig. 3 Microsoft Project template PMO Progress Rollup-Report screen shot

Next on the list are the PMO_Progress Rollup-Inputs, Fig. 2 and PMO_Progress Rollup-Report, Fig. 3 templates.  Purpose of these templates is to communicate project status. With PMO_Progress Rollup-Inputs you choose which tasks either individual, summary, or milestone you want to report on by placing a value, typically 0% as a starting value, in the Last % Complete column.  Once you’ve chosen the individual tasks, summary tasks or milestones to report on you then chose PMO_Progress Rollup-Report view to condense the chart to only those tasks. This allows you to pick and choose ANY item in your WBS to report on. This is much more flexible for reporting than trying to use MS Projects built in filters where you only get milestones, or critical path, or incomplete tasks, etc.   You can then take a screen shot and copy the results into report or presentation.  Refer to screen shot above.   Custom Fields are noted as (CF). 

  • Status Indicator – The Indicators field displays indicators that give different types of information about a task.  Go to the link for more details.
  • Task Name – Regular WBS Task Name
  • Last % Complete  (CF) – Any task that has a value placed in it will condense down to only those tasks when the PMO_Progress Rollup-Report View is chosen.  This allows you to choose individual or summary tasks or milestones to report on for management or status updates.
  • % Complete  – Current % Complete value based on the amount of work completed.  Once you’ve generated the report the first time all values on the Last % Complete field will typically be 0%.  For second and subsequent reports copy and paste the % Complete values into the Last % Complete field.  That way when you run the next report the older values will already be there.

PMO_Progress Rollup-Inputs and PMO_Progress Rollup-Report are formated to print on 8.5″x11″ (letter) sheet for comments and review.

Fig. 4 Microsoft Project template PMO Task Risks screen shot

Fig. 4 Microsoft Project template PMO Task Risks screen shot

 
Fig. 5 Microsoft Project template PMO Task Risks Report screen shot

Fig. 5 Microsoft Project template PMO Task Risks Report screen shot

The next two views are Risk Management views.  Use PMO_Task Risks Inputs, Fig. 4 to capture risk related information for specific tasks and PMO_Task Risks Report, Fig. 5 to condense only those tasks having information in a risk field.  The purpose is to scan the WBS and determine what tasks have risks worth capturing.  It is not the intent to describe a risk for every task.  Your experience should help in identifying tasks with higher severities or probabilities of occurence.  This view can be copied into a report, presentation, or all-encompassing Risk Management file for further analysis.
The following is an explanation of each field.  Custom Fields marked with a (CF) notation. 
  • Task Name – Regular WBS Task Name
  • Risk Cause (CF) – Identification and description of the cause of the Risk.
  • Risk (CF) – Description of the risk, e.g. cost risk, testing risk, resource risk. Be descriptive so management and outsiders can understand. 
  • Risk Effect (CF) – If this risk event occurs what happens to what?
  • Risk Ranking (CF) – Estimated risk based on your ranking criteria.  You could use Low, Medium, High, a Likert scale of 1-5, or something else. The goal is to be consistent.
  • Risk Trigger (CF) – What is the event that will cause the risk to transpire?
  • Risk Mitigation (CF) – Describe what actions, if any, can/will be done to lessen the severity or probability of this risk occurring.
  • Risk Owner – The person who will monitor and determine if the risk trigger has occurred.

PMO_Issues Tracking is formated to print on 8.5″x11″ (letter) sheet for comments and review.

Fig. 6 Microsoft Project template PMO WBS Dictionary screen shot

Fig. 6 Microsoft Project template PMO WBS Dictionary screen shot

 
The last View described in this post is the PMO_WBS Dictionary, Fig. 6.  This should be filled in as or as soon as the WBS is created to capture the intent and scope of the task.  This is helpful in describing, scoping, and level setting what work will be performed and a description of the deliverable, possibly even a description of the acceptance criteria used to measure if the work is properly completed.  During one project we had to describe what WAS and WAS NOT included in any particular task because we were condensing several tasks into one task so it was necessary everyone understood what the task entailed.  It should not be necessary to provide a definition for every task but those tasks that may be confusing or involve many steps.  This should be used as an addendum to your project plan.

 PMO_WBS Dictionaryis formated to print on 8.5″x11″ (letter) sheet.

This post captured six more views discussed in this series. We’ll wrap up the last views in the next post which will be final part of this series. 

If you would like the MS Project file with all views already included send me an email with your request to wayne@all3pm.com and I will forward a copy to you.  Any feedback you care to provide is greatly appreciated. 

Thanks for following…

Post Navigation